When you were kids, your moms and science teachers all told you not to play with chemicals and other fun stuff, right?
Today we’re going to play with chemicals and other fun stuff.
Our lovely Seattle friends Thomas and Dikla visited last weekend, and Thomas wanted to try out the t-shirt bleaching technique he’d been seeing around online. We did some internet research, bought thrift store t-shirts (we already had a plenty of bleach on hand from this bit of questionable advice, filmed at our place a few weeks ago) and got to work.
One of the brilliant things about making designs with bleach (apart from the playing with chemicals part) is that you’re not adding paint or ink, so the design can never wear off. Nor is it dyed, so the design also can’t wash out. In fact, as one of this year’s Desert Bus Craft-Alongers put it, “the graphic will never fade since it’s bleached into the fabric; the fabric can’t regain the colour.”
See? Brilliant.
When doing this project, I highly recommend a bit of experimenting first. It’s the sort of thing you want to get a feel for before diving in and attacking the only t-shirt you could find in just the colour and size you wanted.
———————————————————-
What you’ll need:
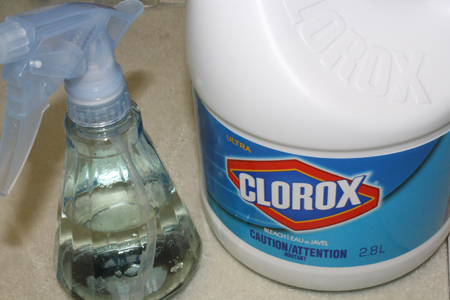
- bleach
- fabric (be it a t-shirt or other garment, a bag, an unsewn piece of cloth to be sewn into something, pillowcases, etc.)
- spray bottle
- water
- a bathtub or other safe place to mess around with bleach
- thick cardboard (a flattened cereal or beer box works well)
- old wire hangers or a clothes drying rack and some clothespins would be useful too
- the design you want to use (whether that’s a computer printout, an original drawing, or whatever else)
- pen or pencil
AND
- clear contact paper
- cardstock or cardboard OR a clear plastic folder
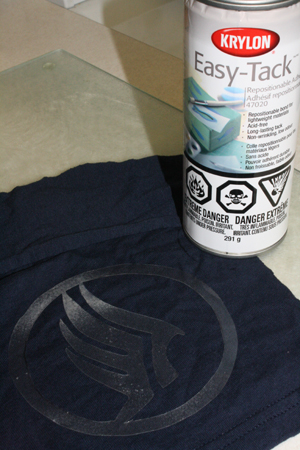
- Easy-Tack or other spray-on, repositionable adhesive (probably available in your local craft or art supply store)
———————————————————-
Putting it all together:
1) Prep yourself and your space. For starters, put on some old wrecky clothes. Or, if no one else is around, this is the sort of project you’d be well advised to just do in the nude. Unless you have a special concrete-floored studio area or a useable garage, you’ll want to do this project in the bathtub, or perhaps a large laundry room or kitchen sink. If using the bathtub, fold your shower curtain up over the bar and out of the way. Move any nearby towels or other bleachable items well out of the way. Gather up a few old rags (that can get bleach on them) to have on hand.
And, of course, get the fabric or bag or garment you wish to put your design on.
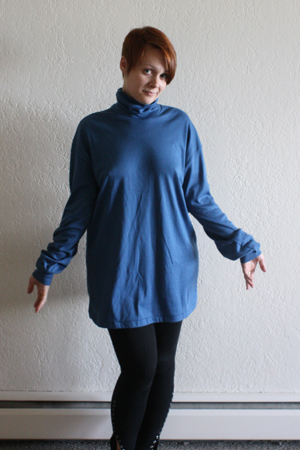
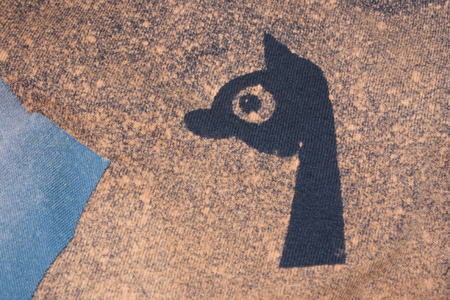
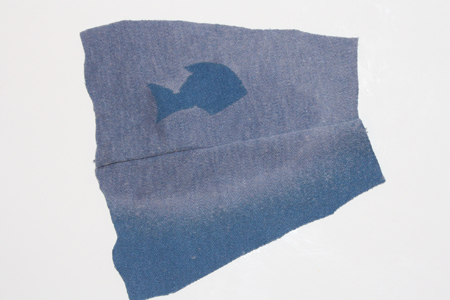
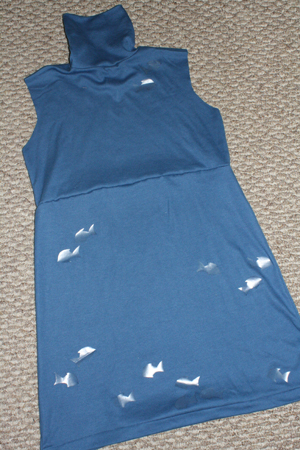
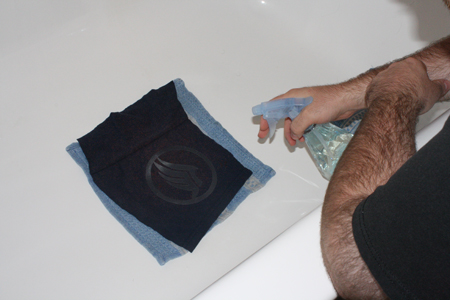
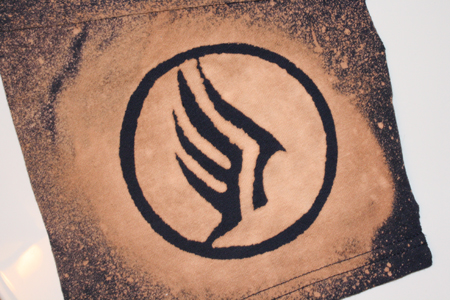
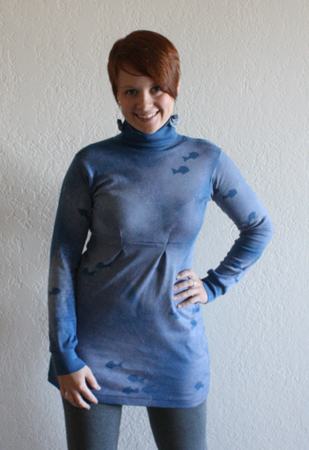
Thomas and I started by doing several trials on scraps of t-shirt material I had leftover from previous projects. He tried a Paragon symbol from Mass Effect, and I did one of my little Tally’s Bestiary logo dudes. After that experimenting, I modded the men’s turtleneck below into a dress and decorated it with little schools of fish.
Notes on choosing fabric: From my own experiences with this, I’ve found that red shirts are very difficult to bleach. My attempts had almost no effect on the red t-shirt scraps I used. Thomas and I bleached some navy shirts where the bleached areas turned quite a bright orange colour. Black shirts will also go orange. On the medium and light blue shirts we tried, the bleached areas went either a lighter blue or a peachy-cream colour. If you have any extra of the fabric you want to bleach, it would be a good idea to do a bleach test on a little scrap to see what it will turn out like.
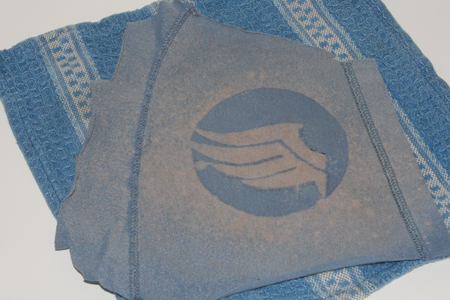
On certain fabrics you’ll also see the bleach spreading more than on others, giving a soft, bleeding-around-the-edges look. This can be partially controlled by how much bleach you spray on.
2) Print or sketch the design you wish to use. If you’re drawing your own design, you can draw it straight onto the contact paper or other template material, or you can draw it onto some paper, then cut it out and trace it onto your template material.
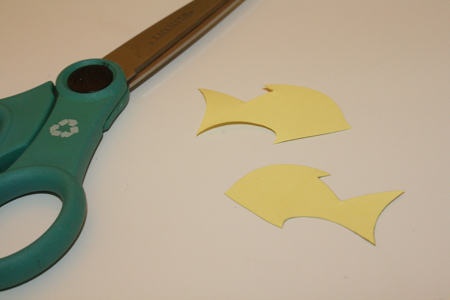
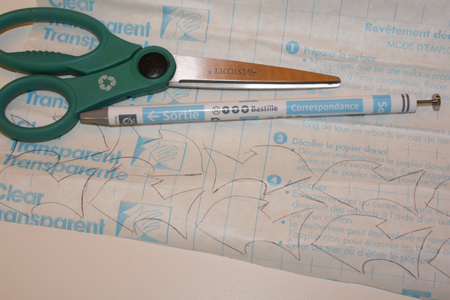
In my case, I wanted to make lots and lots of little fish, so I drew a few designs on cardstock, cut out the one I liked and traced it onto my clear contact paper multiple times.
3) Cut out your templates. I really do recommend clear contact paper, as you can draw right on the paper (so it’s better than the clear plastic folders) and it won’t absorb any bleach and risk it leaking through (so it’s better than cardboard or cardstock), and it’s pre-sticky (so it’s easier than either of those other two materials in combination with an applied adhesive). It’s also easy to cut out the shapes neatly just using scissors.
If you want to do a very controlled design with no spray effects, only a clear image on one specific part of the fabric, you’ll want to use a large square of your template material and cut the image out from its center, using an exacto knife or very small, pointed scissors. Like this guy did. He’s also got some excellent ideas for isolating the area of the shirt you are bleaching, folding the rest under and covering it up with cardboard, AND he has some truly fantastic designs. Definitely have a look at his methods and projects.
4) Apply the template to the fabric. If you’re using clear contact paper, this is as simple as peeling the backing off and sticking the shape where ever you want it.
If you’re using cardboard or cardstock or a clear plastic folder, set it down on a sheet of newspaper with the back side facing up and spray the adhesive on thoroughly, making sure you get all the edges. Follow the directions on the adhesive container. If it says to let it dry for 60 seconds (as the stuff we used did), then let it dry for 60 seconds. If you do, it works like a charm. If you don’t, it doesn’t want to come unstuck again easily and it leaves a gummy residue all over your fabric.
5) Pour some bleach into a small spray bottle, then add about the same amount of water. Half bleach, half water. Swoosh it around a bit in the bottle and you’re ready to go.
7) Take the bleach mixture, the templated fabric or garment, and your own appropriately dressed or undressed self to the bathtub or other safe bleaching area.
If you’re doing something with only one layer of fabric (a test piece, an unsewn piece of cloth, etc.), lay an old rag down in the tub or sink or whatever space you’re using, then put the fabric on top of it. The rag will soak up the bleach that goes through the fabric. Otherwise it will leak through and be redistributed along the slick surface of the tub, bleaching the areas you’ve blocked off from the back side.
If you’re doing a garment or bag or other double-layered item, put a thick piece of cardboard (like a flattened cereal box) between layers, so the bleach doesn’t soak through, say, the front of the shirt and onto the back.
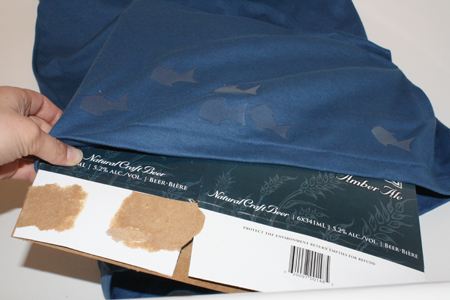
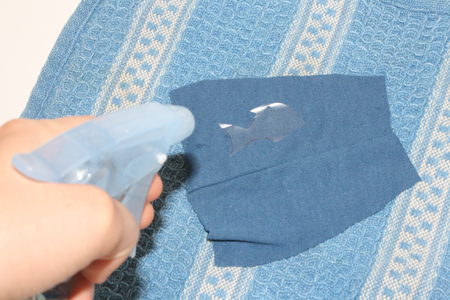
8) Lay the fabric down and get it as flat and smooth as possible. Then spray a light mist of the bleach mixture onto the fabric over and around your template.
DO NOT spray a lot. It may look for a minute like not much is happening. WAIT. If you are the impatient type, get up and walk away and do something else for a few minutes.
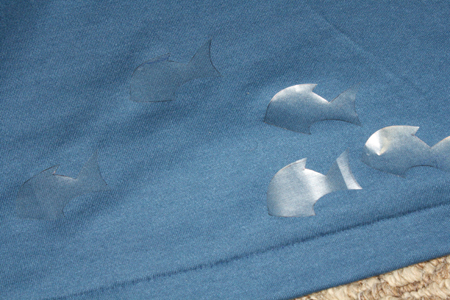
Sometimes the bleach will take a few minutes to really take effect, but when it does, man will it ever take effect. Even with 50% of the mix being water, you don’t need to use much. And you can always add more later. But if you spray too much too soon, it’s liable to leach in under your template and make the edges fuzzy. Thomas and I were both a bit overzealous with the bleach on our first attempts, and got fuzzy edges on our images because of it:
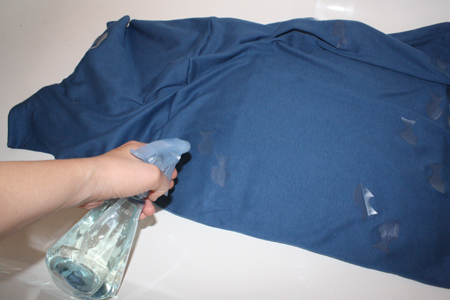
Here’s an example of the bleach doing its job. The photos were taken about 30 to 60 seconds apart. This is from a single, very light spraying of bleach:
If you’re bleaching multiple areas of a garment or other large item (like the dress with the fish shown above), use a rag to wipe any excess bleach spray off the tub before you move the garment around. And be prepared to miss a few bits and have some less than perfect bleach spots here and there. Just go with it – it’s part of the overall design and ambiance, right? Right.
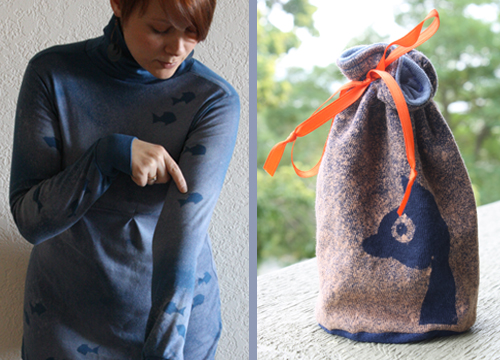
Really, when doing a broad-scale design on a large item like a shirt or dress, I feel it’s wise to choose a design that allows for some inconsistency and imperfection. That is part of why I chose to do fish on the turtleneck dress – water can have weird little speckles and blotches in it and they just make it look more interesting.
9) Once you’ve let it sit for a few minutes, you can spray on more bleach if you wish. When you’re done with the bleaching, remove the templates. Then carefully hang the fabric to dry OR skip to step 10. Our clothespins have mysteriously vanished, so we pinned our trial efforts to a hanger over the bathtub. You could also just stick a clothes drying rack in the tub, or hang the cloth over the edge of the tub.
10) Thoroughly rinse out the fabric in cold water. I did this several times with each piece, to make sure all the bleach was out. The first time you put any garment you’ve bleached in the washing machine, put it in on its own, or in a load of old towels or all whites, just in case.
11) Wear your new shirt, or turn it into a dress or a bag or whatever else. And watch how it never fades!
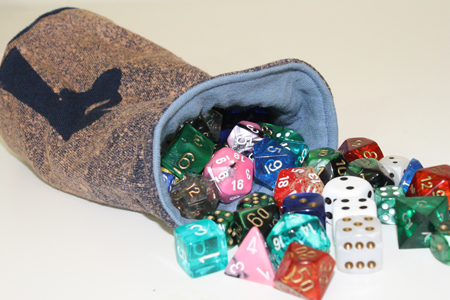
The above piece I made into a dice bag, using the steps described here.
Show off your good side:
And your badass side:
And don’t miss this opportunity to take silly pictures with your pet fish:







Nathan "Myrph" B
/ September 18, 2011This is such a brilliant concept, so fiendishly simple and yet so wonderfully effective! I may have to give this one a go at some point in the future!
I guess it would work just as well in negative too, so I might attempt it with the spare plain black shirt I’ve got lying around!
Thomas
/ September 18, 2011Woooooooo!
Your fist dress looks great, Tally! I just made my templates this morning for Paragon and Renegade, I think I’ll use them tonight or tomorrow. ^_^
N
/ September 18, 2011heh. I was just experimenting with this a month ago. :)
You can also make a tie-dye-like design (if you’re into that) by binding up your fabric/shirt just like you would to tie-dye it, then spraying the bleach on.
admin
/ September 18, 2011Nathan: It definitely looks great in negative, too. Lots of things to try!
Thomas: Sweet! Please show/tell me how they turn out!
N: I like the idea of some funky bleached tie-dye. May have to try that out. :)
Andrew Wade
/ September 18, 2011Aye, I suppose this would also work by spraying bleach through stencils/cut-outs?
Eeeenteresting.
David
/ September 18, 2011Love it! My wife made a shirt like this a while ago with the Horde symbol, it got featured on the WoW insider: http://wow.joystiq.com/2009/06/08/world-of-warcrafts-sugarrats-wow-bleach-shirt/
admin
/ September 18, 2011David: Nice, I remember seeing that! Also, your wife clearly disproves my whole “red shirts don’t work” thing. Though I maintain that they’re more difficult to use.
Andrew: Yes, it most definitely would. And I can just see you steepling your fingers together and raising your eyebrows as you say that. :D
Rebekkah
/ September 19, 2011“the graphic will never fade since it’s bleached into the fabric; the fabric can’t regain the colour.”
…although if you were to subsequently overdye the bleached garment, you might come out with pretty cool results!
Also: I learned when I used to dye my hair that it’s a good idea to finish rinsing away bleach by applying vinegar: the acid (vinegar) reacts with any remaining base (the bleach) to create a salt which dissolves in water as you give one last rinse. Saves that icky soapy feeling bleach can leave you with as it reacts with the lipids in your skin.
Mom
/ September 22, 2011Nice work on Thomas’s part, too! Glad to see he’s succumbing to good influences.
jonnadee
/ December 24, 2011This technique can be done in a much simpler manner if you use a bleach pen. I think Clorox makes them. I haven’t tried it myself, but have seen the results worn by my extremely non-crafty teenage niece and her friends. They said they saw it done online, and decided to try it. One girl made a fabulous scarf, another decorated a mini-skirt, and my niece did a long-sleeved tee.
admin
/ January 7, 2012Oooh, a bleach pen sounds like an excellent idea!
Victoria
/ January 31, 2012How cute are these!? Great job! I linked this up on my blog: http://vixenmade.blogspot.com/2012/01/crafting-with-bleach.html
Jessica
/ September 12, 2012This is the best tutorial I’ve found on this project – thank you so very much!
Tally
/ September 19, 2012Hooray! Glad it was helpful for you! :)
caitlin
/ December 12, 2012I love this- great xmas gift project!
Since I did not have the paper to stick on the fabric, I simply used painters tape. Still worked- though I was just doing words on t-shirts so I didn’t need the sticky stuff to design anything.
purple bridal shower invitations
/ June 29, 2013Howdy! I could have sworn I’ve been to this blog before but after checking through some of the post I realized it’s new to me.
Nonetheless, I’m definitely glad I found it and I’ll be book-marking and checking back often!
MAGDALENA
/ October 19, 2013Hello! Quick question that’s completely off topic. Do you know how to make your site mobile friendly? My blog looks weird when viewing from my apple iphone. I’m trying to find a theme or plugin that might be able to fix this issue. If you have any recommendations, please share. Cheers!
caroline
/ December 8, 2013I have tried this myself. Using the contact paper is a great idea. I had just useD card stock stuck on the shirt. I got fairly good results on the USS Enterprise that I did but fairly awful results on a shirt I tried for my boyfriend. I’m excited to try this again with the contact paper. Awesome idea with the renegade and Paragon sleeves; it looks great. All that needs is a little n7 patch on the front pocket. Thanks for sharing!
Ime Michael
/ March 24, 2014I never knew there is so much mind blowing works done with bleach on fabric. They are inspiring. I will frequent Tally’s Treasure to improve my designing skills with Chemical and Bleach.
เสื้อคู่
/ August 4, 2014Do you have any video of that? I’d want to
find out some additional information.
Monica
/ November 5, 2014Thanks for your tips! After a massive failure on bright blue, I bought a few shirts on sale and had to try red for my nephew’s 4th birthday. It worked! http://instagram.com/p/u6dRlsOOg7/?modal=true
personalized t shirts
/ June 19, 2015Great website. A lot of useful information here.
I’m sending it to some pals ans additionally sharing in delicious.
And obviously, thank you on your sweat!
kossi
/ March 18, 2016Dear Sir
We are modern agency in Ghana, Looking for Company or Individual who can Supply by
Government contract for any of the following items. 1. Drilling Pipe 2.T-
shirt 3. wheel chair 4.orthopedic equipment , 5. Hospital equipment 6. hospital
Towels etc 7. Street light or led light 8. Leaking Washing Machine.
You are to let us know the product of your choice, You can also let us know the
product which your company deal with.
Thanks
Kossi
Freeman
/ July 5, 2016It’s an awesome piece of writing for all the web people; they will obtain benefit
from it I am sure.
Sunita
/ February 24, 2019I am in love with the outcome
suba suba
/ June 11, 2020that I feel I would by no means understand. It kind
Kassie Rowe
/ August 27, 2023Online shopping has changed the way I buy clothes – I could try them on at home and mix and match with my existing wardrobe. Best sellers 2023 products